

Previously on……Marino’s first blog post… I covered the majority of what my homelab looks like. It has 3 physical ESXi hosts providing virtualization, a network, and NFS storage. One thing I called out was my desire to leverage Kubernetes to create and span my applications. You might have seen 4 VMs, with the names K8s_Master and K8s_Worker. To tell you the truth, this wasn’t a fully working cluster. You also might be wondering why I decided not to use a Kubernetes service like GKE, EKS, or AKS. A bit more later but, first a basic visual, and then, onto my configuration…
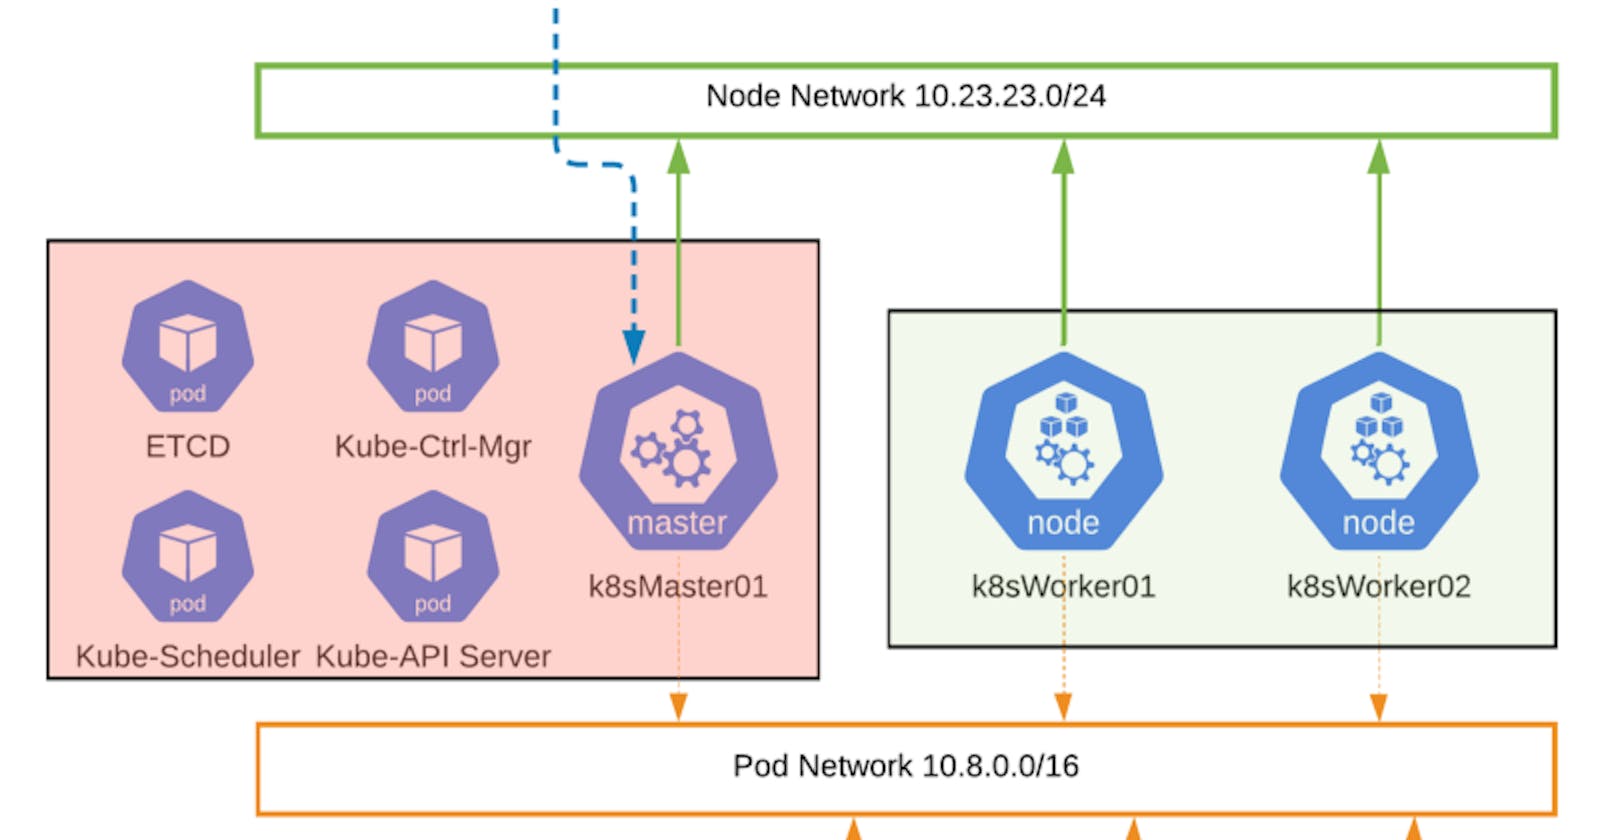
3-node K8s Cluster on 3 x Ubuntu 16.04 LTS VMs, in vSphere
How to build my first working (or really fourth, since the first three didn’t work); Config now, Backstory later:
In order to build a 3-node K8s cluster, with 1 master and two workers, I set up the prerequisites in the following manner:
- 3 x Ubuntu VMs running Ubuntu Server 16.04 LTS (It’s called Xenial Xerus, I don’t know why). I deployed 3 into my vSphere cluster, and additionally created some templates for easier deployment, later.
- Each Ubuntu VM can have 2–4 CPUs, and 2–8GBs of RAM. The more you have, the better. I spec’d out 1 master node at 4 vCPUs and 8GBs of RAM, while my workers had just 6GBs of RAM
- A working /24 subnet, called the node network. I already have this, I’m being a simpleton and using my MGMT network, 10.23.23.0/24.
- Static IP addressing or DHCP addressing with reservations (much easier)
- These 3 VMs need to be ICMP reachable amongst each other, which means, if you’ve enabled a local firewall on Ubuntu, you’ll need to allow ICMP in/out. There are various other ports that need to be opened in/out as well but, to save you some time, disable that firewall (I know, it’s not the best practice but, do you want to spend time messing with a firewall or deploying a K8s cluster?)
- DNS resolution set up for your master and workers, in addition to one DNS entry called “cluster-endpoint.[DNS Suffix].domain”. This is important if, in the future you decide to create an HA setup, which I intend to do.
- Seriously, leverage a very good search engine, if you’re struggling with the above.
The actual config:
You can totally automate the majority of the work using cloud-init. I’m unfortunately not that skilled, yet, so, it’s all manual from here.
Note, this is not “Kubernetes the Hard Way”. That’s too much man. I used Kubeadm to provision my cluster.
Now here’s what I did on each one of my nodes, master and workers. While attempting on your own, it might be helpful to do this one by one for now, and then use some terminal which runs commands on multiple sessions:
- Install updates and then install Docker
So In this step, I update the Ubuntu OS and grab some necessary updates. I then proceed to set the Docker GPG key, and add the Docker apt repository. I finally install Docker, create a directory and then restart the Docker daemon.
#Switch your account to have root capabilities, don't switch to root
k8sadmin@k8sMaster01:~$ sudo su
**[sudo] password for k8sadmin:
root@k8sMaster01:/home/k8sadmin#
apt-get update && apt-get install -y \
apt-transport-https ca-certificates curl software-properties-common gnupg2
curl -fsSL download.docker.com/linux/ubuntu/gpg | apt-key add —
#add-apt-repository for docker \
**“deb [arch=amd64] download.docker.com/linux/ubuntu \
$(lsb_release -cs) \
stable”
# Setup the Docker daemon.
**cat > /etc/docker/daemon.json <<EOF
{
“exec-opts”: [“native.cgroupdriver=systemd”],
“log-driver”: “json-file”,
“log-opts”: {
“max-size”: “100m”
},
“storage-driver”: “overlay2”
}
EOF
mkdir -p /etc/systemd/system/docker.service.d
# Restart Docker services.
**systemctl daemon-reload
systemctl restart docker
2. Install Kubernetes using Kubeadm Assuming I’ve (as well as you have) successfully deployed Docker, I then proceed to setup and switch to a supported legacy version of IPtables (I’m still researching as to why). I then pull down the GPG key from Google so I can successfully pull down Kubelet, Kubeadm, and Kubectl.
Some definitions:
Kubeadm: A tool used to create new Kubernetes clusters starting with the control plane. It is used to additionally join worker nodes to a cluster. It basically sets up containers for the ETCD Key-value DB, CoreDNS which is a lookup service, and additionally sets up all certificates for the different components to communicate.
Kubectl: The command line utility for CRUD-style operations on various onbjects on a Kubernetes cluster; Imperative or Declarative.
Kubelet: An agent on a node that ensures containers are running in a pod, and additionally communicates with the Kube-API.
#IPTABLES
# ensure legacy binaries are installed
**sudo apt-get install -y iptables arptables ebtables
# switch to legacy versions
**sudo update-alternatives — set iptables /usr/sbin/iptables-legacy
sudo update-alternatives — set ip6tables /usr/sbin/ip6tables-legacy
sudo update-alternatives — set arptables /usr/sbin/arptables-legacy
sudo update-alternatives — set ebtables /usr/sbin/ebtables-legacy
#Install Kubeadm, kubelet, kubectl on MASTER/Worker nodes
**sudo apt-get update && sudo apt-get install -y apt-transport-https curl
curl -s packages.cloud.google.com/apt/doc/apt-key.gpg | sudo apt-key add -
cat <<EOF | sudo tee /etc/apt/sources.list.d/kubernetes.list
deb apt.kubernetes.io kubernetes-xenial main
EOF
sudo apt-get update
sudo apt-get install -y kubelet kubeadm kubectl
sudo apt-mark hold kubelet kubeadm kubectl
This command below is a bit critical. I am effectively disabling swap, because if it enabled my Kubelet service won’t run. I can actually check this by running systemctl status kubelet which will tell me if the service is up. Additionally, I disable swap because I don’t want to use local disk; I let Kubernetes be efficient with my memory requests.
#run on Master/worker node
**swapoff -a
When I open /etc/fstab I want to comment out the line which contains “swap”, and then save the file. This keeps the “swap off” persistent across reboots.
sudo nano /etc/fstab*#/dev/mapper/k8sMaster01 — vg-swap_1 none swap sw 0 0*
3. Enable the Master node for Control Plane activities
#run on master only
kubeadm init — pod-network-cidr=10.8.0.0/16 — control-plane-endpoint=cluster-endpoint.6ix.local
#make sure you create a DNS entry that ties to the first master node #IP to “cluster-endpoint”, and later load-balancer
To run kubeadm init I specify the Pod network CIDR in the form of 10.8.0.0/16, as well as a “control-plane-endpoint=cluster-endpoint.6ix.local”. Note, you must specify the DNS suffix for the “control-plane-end-point”.
A summary of what occurs after running kubeadm init:
- All the control-plane pods are deployed to the master node, things like the Kube-API-Server, the Kube-Scheduler, and a few others.
- CA Certificates generated and shared between control-plane components for secure communications.
- Adding a “taint” to the master node to prevent application pods from being scheduled on the master.
Here’s me running the kubeadm init command with a few arguments followed by the output.
root@k8sMaster01:/home/k8sadmin# kubeadm init — pod-network-cidr=10.8.0.0/16 — control-plane-endpoint=cluster-endpoint.6ix.local
W0307 17:08:05.404645 7044 validation.go:28] Cannot validate kubelet config — no validator is available
W0307 17:08:05.404701 7044 validation.go:28] Cannot validate kube-proxy config — no validator is available
[init] Using Kubernetes version: v1.17.3
[preflight] Running pre-flight checks
[preflight] Pulling images required for setting up a Kubernetes cluster
[preflight] This might take a minute or two, depending on the speed of your internet connection
[preflight] You can also perform this action in beforehand using ‘kubeadm config images pull’
[kubelet-start] Writing kubelet environment file with flags to file “/var/lib/kubelet/kubeadm-flags.env”
[kubelet-start] Writing kubelet configuration to file “/var/lib/kubelet/config.yaml”
[kubelet-start] Starting the kubelet
[certs] Using certificateDir folder “/etc/kubernetes/pki”
[certs] Generating “ca” certificate and key
[certs] Generating “apiserver” certificate and key
[certs] apiserver serving cert is signed for DNS names [k8smaster01 kubernetes kubernetes.default kubernetes.default.svc kubernetes.default.svc.cluster.local cluster-endpoint.6ix.local] and IPs [10.96.0.1 10.23.23.209]
[certs] Generating “apiserver-kubelet-client” certificate and key
[certs] Generating “front-proxy-ca” certificate and key
[certs] Generating “front-proxy-client” certificate and key
[certs] Generating “etcd/ca” certificate and key
[certs] Generating “etcd/server” certificate and key
[certs] etcd/server serving cert is signed for DNS names [k8smaster01 localhost] and IPs [10.23.23.209 127.0.0.1 ::1]
[certs] Generating “etcd/peer” certificate and key
[certs] etcd/peer serving cert is signed for DNS names [k8smaster01 localhost] and IPs [10.23.23.209 127.0.0.1 ::1]
[certs] Generating “etcd/healthcheck-client” certificate and key
[certs] Generating “apiserver-etcd-client” certificate and key
[certs] Generating “sa” key and public key
[kubeconfig] Using kubeconfig folder “/etc/kubernetes”
[kubeconfig] Writing “admin.conf” kubeconfig file
[kubeconfig] Writing “kubelet.conf” kubeconfig file
[kubeconfig] Writing “controller-manager.conf” kubeconfig file
[kubeconfig] Writing “scheduler.conf” kubeconfig file
[control-plane] Using manifest folder “/etc/kubernetes/manifests”
[control-plane] Creating static Pod manifest for “kube-apiserver”
[control-plane] Creating static Pod manifest for “kube-controller-manager”
W0307 17:08:08.184477 7044 manifests.go:214] the default kube-apiserver authorization-mode is “Node,RBAC”; using “Node,RBAC”
[control-plane] Creating static Pod manifest for “kube-scheduler”
W0307 17:08:08.185278 7044 manifests.go:214] the default kube-apiserver authorization-mode is “Node,RBAC”; using “Node,RBAC”
[etcd] Creating static Pod manifest for local etcd in “/etc/kubernetes/manifests”
[wait-control-plane] Waiting for the kubelet to boot up the control plane as static Pods from directory “/etc/kubernetes/manifests”. This can take up to 4m0s
[apiclient] All control plane components are healthy after 33.501842 seconds
[upload-config] Storing the configuration used in ConfigMap “kubeadm-config” in the “kube-system” Namespace
[kubelet] Creating a ConfigMap “kubelet-config-1.17” in namespace kube-system with the configuration for the kubelets in the cluster
[upload-certs] Skipping phase. Please see — upload-certs
[mark-control-plane] Marking the node k8smaster01 as control-plane by adding the label “node-role.kubernetes.io/master=’’”
[mark-control-plane] Marking the node k8smaster01 as control-plane by adding the taints [node-role.kubernetes.io/master:NoSchedule]
[bootstrap-token] Using token: t93bd2.zbbxn427avfsdsq4
[bootstrap-token] Configuring bootstrap tokens, cluster-info ConfigMap, RBAC Roles
[bootstrap-token] configured RBAC rules to allow Node Bootstrap tokens to post CSRs in order for nodes to get long term certificate credentials
[bootstrap-token] configured RBAC rules to allow the csrapprover controller automatically approve CSRs from a Node Bootstrap Token
[bootstrap-token] configured RBAC rules to allow certificate rotation for all node client certificates in the cluster
[bootstrap-token] Creating the “cluster-info” ConfigMap in the “kube-public” namespace
[kubelet-finalize] Updating “/etc/kubernetes/kubelet.conf” to point to a rotatable kubelet client certificate and key
[addons] Applied essential addon: CoreDNS
[addons] Applied essential addon: kube-proxy
Your Kubernetes control-plane has initialized successfully!
To start using your cluster, you need to run the following as a regular user:
mkdir -p $HOME/.kube
sudo cp -i /etc/kubernetes/admin.conf $HOME/.kube/config
sudo chown $(id -u):$(id -g) $HOME/.kube/config
You should now deploy a pod network to the cluster.
Run “kubectl apply -f [podnetwork].yaml” with one of the options listed at:
https://kubernetes.io/docs/concepts/cluster-administration/addons/
You can now join any number of control-plane nodes by copying certificate authorities and service account keys on each node and then running the following as root:
kubeadm join cluster-endpoint.6ix.local:6443 --token t93bd2.zbbxn427avfsdsq4 —-discovery-token-ca-cert-hash sha256:5ac67a9b2bb9d65844608779870be45adf02e297953fbc179553c3557572b465 —-control-plane
Then you can join any number of worker nodes by running the following on each as root:
kubeadm join cluster-endpoint.6ix.local:6443 --token t93bd2.zbbxn427avfsdsq4 —-discovery-token-ca-cert-hash sha256:5ac67a9b2bb9d65844608779870be45adf02e297953fbc179553c3557572b465
root@k8sMaster01:/home/k8sadmin# exit
exit
The reasons for specifying “control-plane-endpoint” in my Kubeadm init command is for future high-available of my control plane. This means more Kubernetes masters, and if one fails, another is available. I mentioned creating a DNS entry for “cluster-endpoint”, as you can tie this DNS record to a Load-balanced VIP (virtual IP) that maps back to several master nodes. You don’t actually need this if you don’t plan to have HA, but please, try it out :).
4. Set kubeconfig to be able to access master/workers
#Enable your master to run kubectl*
#exit out of root capabilities*
mkdir -p $HOME/.kube
sudo cp -i /etc/kubernetes/admin.conf $HOME/.kube/config
sudo chown $(id -u):$(id -g) $HOME/.kube/config
5. Install Container Network Interface (Weave or Calico)
#Choose one CNI, and apply it on Master node
kubectl apply -f “cloud.weave.works/k8s/net?k8s-version=$(kub.. version | base64 | tr -d ‘\n’)” #weavenet
#OR
kubectl apply -f docs.projectcalico.org/v3.11/manifests/cali..
6. Join the workers to the Kubernetes Cluster
Below is my join command. You actually will use your own unique join command, with its own token and hash. If you try mine, it will error out as node isn’t publicly routed, and the token is only valid for 24 hours :). If you lose the join command, you can regenerate a new one from the master using the following syntax:
kubeadm token create —-print-joint-command
#the command below will be presented on the master, run on worker
kubeadm join cluster-endpoint.6ix.local:6443 --token t93bd2.zbbxn427avfsdsq4 —-discovery-token-ca-cert-hash sha256:5ac67a9b2bb9d65844608779870be45adf02e297953fbc179553c3557572b465
7. Verify that essential services are running
k8sadmin@k8sMaster01:~$ kubectl get nodes
NAME STATUS ROLES AGE VERSION
k8smaster01 Ready master 6d17h v1.17.3
k8sworker01 Ready 6d17h v1.17.3
k8sworker02 Ready 6d17h v1.17.3
k8sadmin@k8sMaster01:~$ kubectl get pods -n kube-system
NAME READY STATUS RESTARTS AGE
coredns-6955765f44-jnjxw 1/1 Running 1 6d14h
coredns-6955765f44-t68dm 1/1 Running 1 6d14h
etcd-k8smaster01 1/1 Running 2 6d17h
kube-apiserver-k8smaster01 1/1 Running 2 6d17h
kube-controller-manager-k8smaster01 1/1 Running 2 6d17h
kube-proxy-55plp 1/1 Running 2 6d17h
kube-proxy-6pz4q 1/1 Running 2 6d17h
kube-proxy-kzxp8 1/1 Running 2 6d17h
kube-scheduler-k8smaster01 1/1 Running 2 6d17h
weave-net-2jldz 2/2 Running 5 6d17h
weave-net-m5b88 2/2 Running 6 6d17h
weave-net-pvrhv 2/2 Running 6 6d17h
k8sadmin@k8sMaster01:~$
If you add the “-o wide” flags to each command, you will see additional information. That cluster is ready for some action =D!
Time for that backstory:
So, I’ve been playing around with Kubernetes. It all kind of started one day, when I was in a meeting with a peer SE and a customer, and that peer started talking about “microservices”. I thought I’d be smart, and say “Oh, things like NTP, DNS, DHCP? His response was “no”. This piqued my curiosity and I decided to dig a bit deeper.
About 1.5 years later and I’m in another meeting with a customer and they are asking all kinds of Kubernetes questions. I felt kind of knowledgeable, in that I knew how to spell Kubernetes, K-u-b-e-r-n-e-t-e-s, and I knew what a pod was. I was just caught red-handed because when I thought I was a 5/10, I was really a 5/100. After moving onto another role, I felt that I needed to recalibrate my understanding a bit and start properly learning Kubernetes.
Kubernetes felt a bit too much for me and I tried to find a way to understand it. I worked my way from the inside out, and started with how Pods get networked.
I started playing with it a bit more using GKE (as I was learning about GCP over the last year), and stumbled upon Nigel Poulton’s Kubernetes course. It was a great intro to Kubernetes but it wasn’t enough. So I dug deeper and played with EKS and GKE a bit more but, these were managed services where the control-plane was already built, and you essentially just start creating deployments within your worker nodes. I finally came across the CKA which put me onto many more resources.
Fast forward to a month ago where I was attempting to build my Kubernetes cluster. I first tried building clusters with Ubuntu 19.10, and then 18.04 LTS, but had no luck. I tried deploying K3s with Multipass on my Mac, and while it resembled a K8s cluster, it wasn’t my time to start deviating from K8s. And then, I finally decided to search for a suitable release that worked, Ubuntu 16.04 LTS was the one for me! This works and will serve as my own test-bed while I become better and try various things in Kubernetes.
In closing, all what I described above, should be more than adequate to have a functional Kubernetes cluster. This aligned with my long-term goals as I need to know how to build and run Kubernetes to globally distribute an application I deploy in the future.
In future posts, I’ll explore removing the current CNI and throwing in the VMware Tanzu Antrea CNI, deploying some basic applications and, I will expand more on Kubernetes concepts as it relates to my long-term goals.